
Get Started with Squarespace
In this guide you'll learn how to start using your Squarespace website, add users, and create and edit pages and posts. If you have additional questions about getting started, please let us know!

1. Log in
Enter your user name and password at https://squarespace.com/login.
This page is also where you may reset a lost password or username if needed.

2. Enter your billing information
Before we assign ownership of the site to you, please update the billing section with your payment details for future hosting and domain expenses.
The billing section is located in the left side Home menu under Settings > Billing & Account > Billing.
*This same billing section, under Subscriptions, is where you can upgrade your hosting plan to accommodate more content, change your billing cycle from yearly to monthly (or vice versa), or cancel your website.
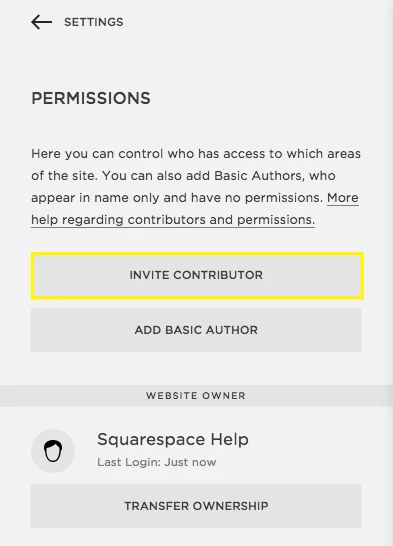
3. Add and change site contributors (users)
The basic hosting package includes 2 users, or "contributors." If you need more, you will be prompted to upgrade your hosting package.
To add or change your users, in the left side Home menu go to Settings > Permissions.
In the Invite Contributor window, enter the name and address of the new contributor. Check all the boxes for which you want this person to have access to your site: Administrator, Content Editor, Billing, etc. For details on what permission levels mean, visit Squarespace permissions explained.
Click Save to send the invitation. The contributor will receive an email invitation asking them to finish creating their account, or log into their existing one (if they have a Squarespace account already).
The Permissions section also allows you to remove contributors and transfer website ownership if needed.
4. Analytics
Squarespace includes built-in analytics that will provide valuable information about your audience. The Analytics panel is located under Analytics in the left Home menu.

The Squarespace Analytics panel
If needed, you can add Google Analytics to the site by entering your Google Analytics account number in under Settings > Advanced > External Services.
For more information on analytics, visit Squarespace analytics overview.

5. Navigating your site through the admin area.
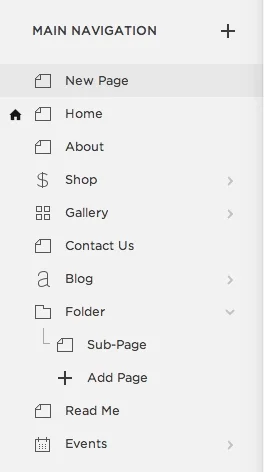
Most of your site is organized into pages. You can access and edit pages from the left side Home menu under Pages.
The pages that appear in your site's main navigation menu are shown under Main Navigation. You can reorder these pages by dragging the icons up or down in the list.
Beneath Main Navigation, the Secondary Navigation section contains any pages that are shown in menu at the bottom, or footer, of the site. Not all sites use this menu.
Beneath Secondary Navigation, a third section called Not Linked contains any pages that are not linked from a navigation menu.
In addition to pages, these menus usually also contain a blog, where you will create most of your posts and news content. They may also contain galleries, indexes (stacked pages), and folders (which can hold a set of sub-pages.)
Please use care when making changes to pages and menu settings, as we do not retain a backup of your site and cannot "undo" any changes you make.
6. Adding pages
To add a new page, click "+" next to Main Navigation, Secondary Navigation, or Not Linked, depending where you want the page to appear.

Enter a page title. You will be prompted to choose a base layout or you may begin with a blank page. Make your selection, or leave it blank for a blank page, and click "Start Editing."
For more information on working with pages, visit building a page.
8. Editing pages and posts
To edit an existing page or post, navigate to the page/post you want to edit. You will see the following bar when you hover over the page or post's content area. Click "Edit."

When you have opened the "Edit" option, the page content will expand and text editing options will appear, along with dark bubbles that appear when you hover over different areas of the page/post.
To edit text: click inside the text area and use the keypad and text editing controls – just like your word processing software. Highlight text and use the editing options to create headings, lists, links and more.
To add other content such as images or embedded objects: hover over one of the dark bubbles (circled below) where you want to add the content and click. A pop-up menu (shown below) will show all of the objects and content types you can add.

The process is basically the same to edit existing pages and existing posts, though in posts the content area opens up in a slightly different way. But the functions and content options for pages and posts are the same.
Tip: to copy and paste content from a Word document into a page or post, always use the clipboard icon:

Pasting into the clipboard window will remove all extra formatting from Word that can mess up the appearance of your text. Content display problems usually stem from pasting Word documents directly into the content area.
Please note: If editing pages and posts, always maintain a current backup copy of all of your content as Google docs, in Word or in another offline format. We do not retain backup copies of any of your content after launch, and it may be lost if accidentally deleted.
7. Adding news/blog posts
If your site has a news or blog section, you will navigate to it like any other page – the Blog page appears with a letter "a" icon next to it instead of a "page" icon and it is usually called News, Latest News, or something similar.
Your blog page will include a list of posts on the left side menu. To add a new post, click "+" at the top of the list to add a new blog post.
To edit an existing post, click the post name at left to bring it into the main (right) window, and then hover over it to bring up the edit button – just like with a page. Within "edit" mode, you may hover to type or add other content as you would on a page.
To change the post date, tags, categories, author, image, excerpt and more, select "Settings" in the dark top bar when you are in the post's "edit" mode.

If your news posts appear in other places on your site, such as the homepage, it's important to add an excerpt to new posts. This short summary or teaser usually appears below your post title, unless this is not part of your approved design. You may also want to add a thumbnail image, especially if your news page displays images, or if you are sharing posts to social media. You can add an excerpt, image, and make other changes to your post in the "Content" and "Options" areas as shown below.

For more on working with posts, visit Blogging with Squarespace.
8. Editing site styles
You can preview and make changes to the look of your site, like changing fonts, colors and backgrounds, using the Style Editor.
Navigate to the Style Editor from the left Home Menu under Design > Style Editor. Then click the area of the page you want to change, use the search bar at top left, or just scroll down the list of styles until you find what you want to change. The main window will preview your changes until you click "Save" at top left. After you save, style changes cannot be automatically reversed – all style changes are manually entered.
For more details on working with the Style Editor, visit making style changes.
Please note: we don’t keep a backup copy of your website's styles after launch, so you are fully responsible for any style changes you make to the site after it goes live. Also, your site may include custom styling code that is not accessible through the Styles panel. Making changes in this panel may have unintended effects on any custom code, so please use caution when making changes.

9. Connect social media accounts
Usually your site will launch already integrated with your social media platforms. But if you need to add a platform or enable automatic publishing of your site posts across other platforms, you may need to access the Connected Accounts area.
In the left Home menu, go to Settings > Connected Accounts. Click Connect Account. In the Connected Accounts menu, select the account you want to add. An authorization step may be required, depending on the platform.
For details, visit connecting social accounts.

10. Improving SEO
SEO, or search engine optimization, deals with how your site is ranked by search engines. This process involves many different algorithms that are always changing, so there is not one exact answer that will ensure your site gets a higher ranking. As search tools become more sophisticated, there is no exact "formula" to guarantee you a top page ranking.
When your new site launches, it may take from a few days up to a couple of weeks for Google to find and add your site to search rankings. We do not control this process, but it is our practice generally to optimize site content and register the site with Google to encourage Google to index your site as quickly as possible.
Our Squarespace sites are built with optimizations that ensure higher rankings are possible over time, if you continue posting new, high-quality content consistently. This remains the number one way to improve your overall search engine visibility and performance. Here are a few more recommendations that can help:
A. Here is the official Squarespace SEO checklist with tips to improve your website’s search presence. Most of these steps will be done before launch, but you can always edit your own page descriptions, post descriptions, and other content as needed. We recommend verifying your site with Google Search Console. This can help you identify any problems preventing better site rankings.
B. When creating pages and posts, be sure to use correctly structured HTML and always create page descriptions, tags, categories, image "alt" tags and other identifiers to make your content easier for search engines to understand and index. For more details on this, visit increasing your site's visibility to search engines.
C. For a faster SEO boost, a targeted digital advertising strategy can be the most effective tactic. Contact us to discuss.